All posts by Pierre-Luc Soucy

Cabot Trail – solo bicycle ride in 3 days (5 total including to/from Sydney)

After considering doing it for a few years, I finally did the Cabot Trail this month and am glad I did. I’ll share my experience here in case it can help other people planning similar trips, especially given the relative scarcity of information I could find prior to my own trip.

Note that I did this trip solo, sleeping in motels/hotels/Airbnbs, as I prefer to go at my own pace and it was also cheaper than with the organized tours.

Day 0: Montreal to Sydney

I flew from Montreal to Sydney on Aeroplan miles, with an almost 12 hour layover in Halifax on purpose. This allowed me to visit the city (public market, harbour walk, citadel, public library and Canadian Museum of Immigration) and it was a nice side trip.

I then got to Sydney past 11 PM and was a bit concerned about getting a taxi to my Airbnb as the airport website is not very clear on the system. It turns out that there are taxis waiting at the airport, and a driver came to me while I was trying to get connected on the phone with the taxi company. It’s a flat $15 rate to go to downtown from the airport, which is very reasonable given that it’s a 13 km ride.

Day 1: Sydney to Baddeck (80 km, 825 m of climbing)

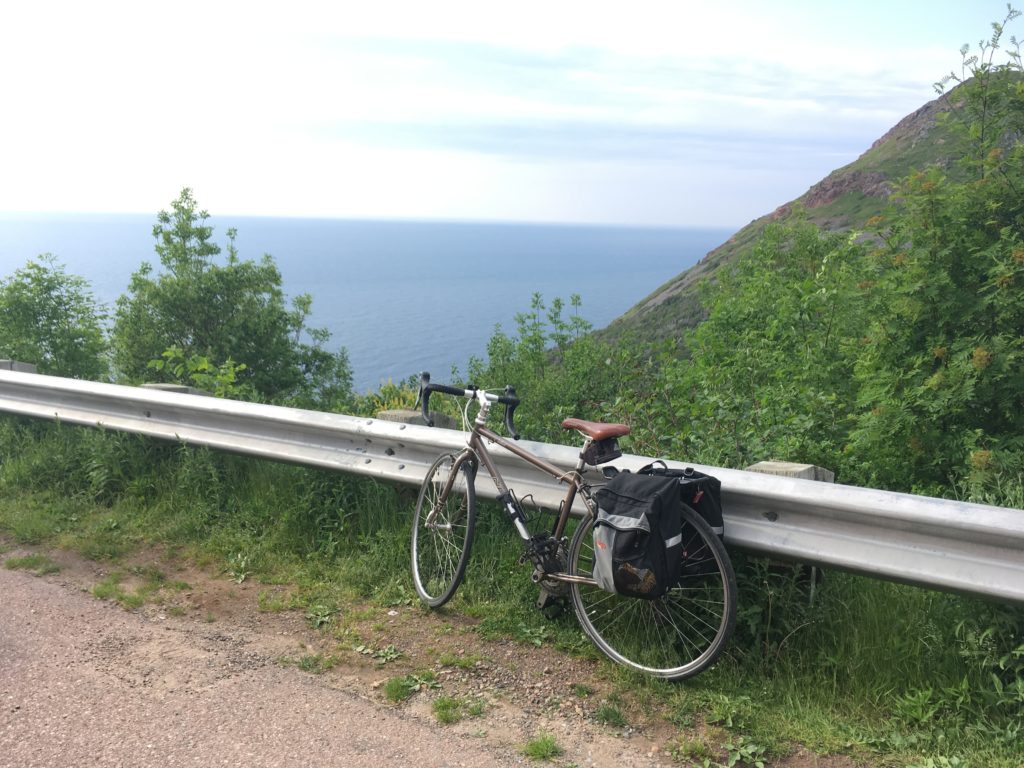
I took possession of my touring bike from FrameWork Cycle & Fitness – at $175 for the week, I figured it made sense to rent rather than carry my own bike on the plane, with the associated hassle and surcharges. I then rode to Baddeck, my starting point for the Cabot Trail. Google Maps cycling instructions tried to get me to go on a side road and then the Trans Canada Trail, but I backtracked after about 1 km of that as the trail was really bad, with water all over and huge potholes. I used the highway instead (bikes are allowed), and aside from the rumble strips that took most of the shoulder in climbs (two car lanes, narrower shoulder), everything went well.

Once in Baddeck, I checked in at my hotel, took a shower, and then tried Baddeck Lobster Suppers, where I got lobster with all-you-can-eat mussels and seafood chowder + dessert for $45. It’s not fancy, but the food is good and I did have a second serving of mussels – it was a good spot after a day of riding the bike.

Day 2: Baddeck to Neil’s Harbour (122 km, 1500 m of climbing)

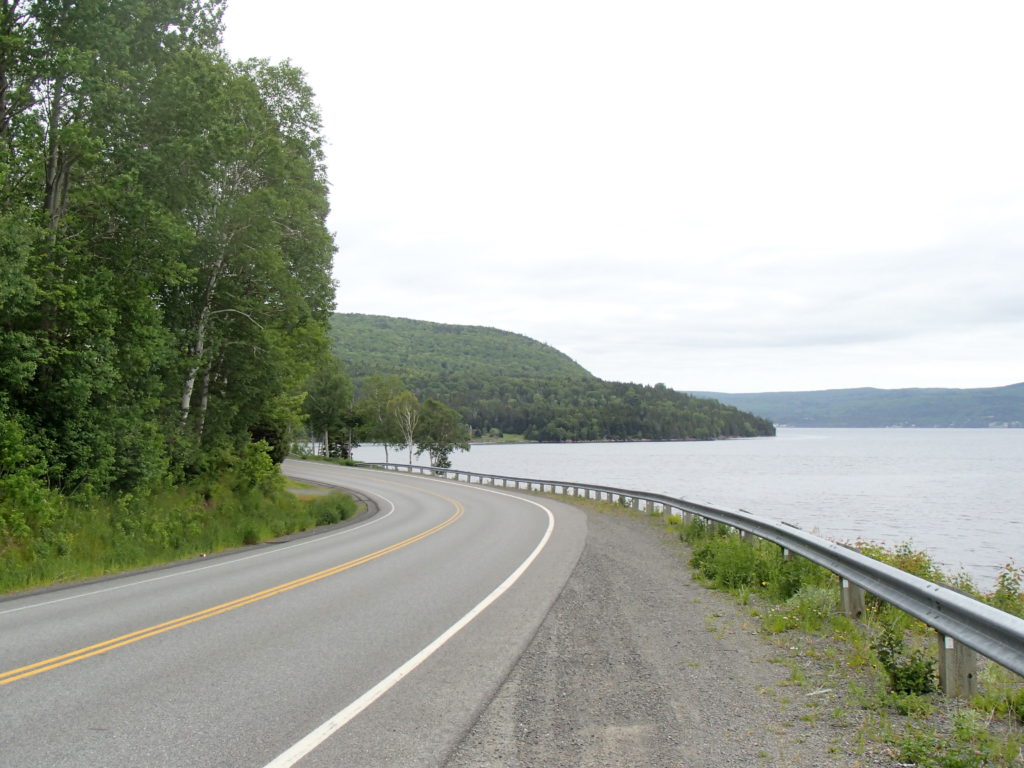
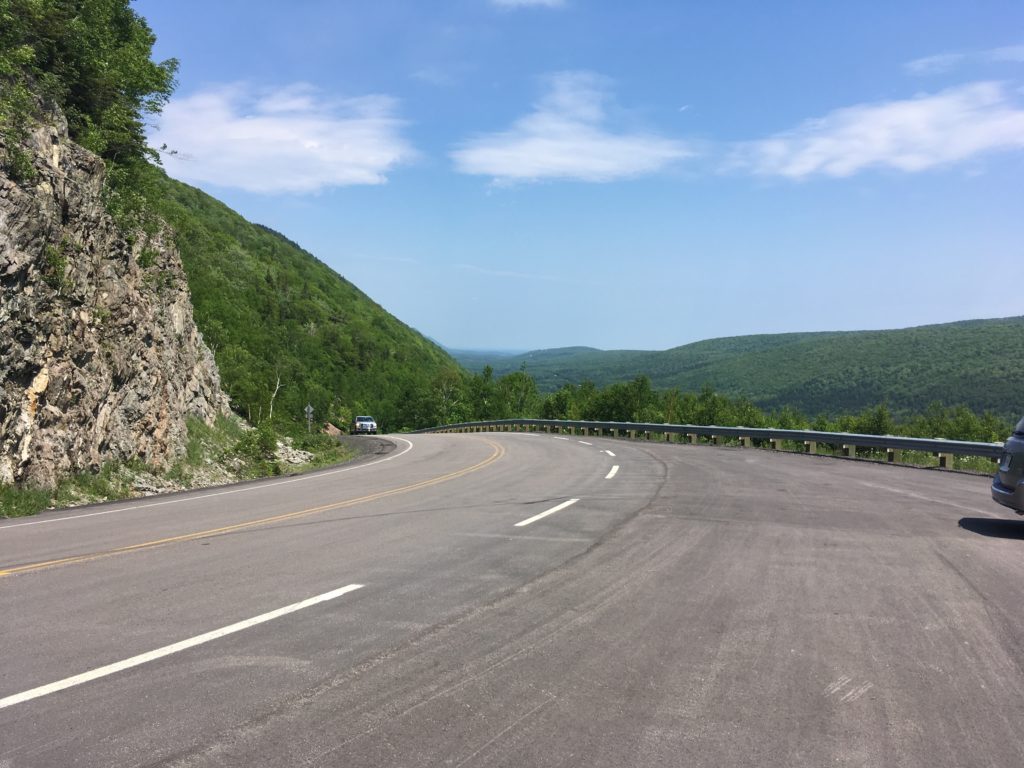
This was the start of the Cabot Trail for me. I was concerned about food options, so I had cookies, chocolate bars and chips on my bike, and had some of that around kilometer 20 to get an energy boost after a climb. I then stopped for lunch around kilometer 60 and got more food at Wreck Cove (km 72). There were a  lot more food options than I expected along the road – one thing I realized is that not all of the stores/restaurants are listed (or easily found, anyway) on the internet, but they advertise with signs next to the road (XYZ Cafe, 5 km, for example). Right after Wreck Cove, there was a 250+ meter climb on Smokey Mountain – some parts were challenging, but it wasn’t too much of a problem in lower gear. The long descent following that was nice.

After about 8 hours, I finally got to my Airbnb RV in Neil’s Harbour and went to have dinner at the Chowder House, only to find out that it is closed on Mondays. That’s the only restaurant in town, and the grocery store (co-op) closed an hour before (at 6 PM), so I got ice cream at the ice cream parlour, ate a few snacks, and figured I’d go to the grocery store to get a decent breakfast the next day.

I enjoyed the fresh night (12°C on July 2nd) and slept well, in preparation for the toughest day of the tour.

Day 3 – Neil’s Harbour to Chéticamp (91 km, 1830 m of climbing)

While not the longest day of the tour in terms of distance, this was by far the toughest, with two big climbs and a temperature that felt like 35°C in the shade according to The Weather Network – except I was riding in full sun, on black pavement. I ended up drinking more than 6 liters of water and used two electrolyte maintenance powder pouches on that day.

I figured I’d have lunch in Pleasant Bay, at around half the distance and after the North Mountain climb – the first of the two big climbs for the day. It took me over 4.5 hours to ride the 47 km to Pleasant Bay, and I stopped *many* times during the North Mountain climb that morning.

I had a decent meal in Pleasant Bay, refilled my Cameback and water bottle, and went on to climb the MacKenzie mountain, which wasn’t nearly as challenging as North Mountain (it was also a bit cooler at that point). There were a lot of pretty views along the way, and I got to Chéticamp a bit past 7 PM. Being a native French speaker, I enjoyed being able to communicate in French with several of the Acadian people living/working there.

Day 4  – Chéticamp to Baddeck (89 km, 780 m of climbing)

The day started with a strong headwind where I was going about 14 km/h for the first 20 km or so, but it got much better after that, after I got further from the sea. I wanted to get to Baddeck early if possible in order to visit the Alexander Graham Bell National Historic Site, so I took fewer breaks and did my best time that day (17.1 km/h average including breaks, despite the slow start). The climb up Hunter’s Mountain near the end was relatively easy compared to climbs in the previous days.

I got in Baddeck early enough to spend 1.5 hours at the Alexander Graham Bell National Historic Site and found it interesting and worthy of a visit – he’s well known for his invention of the telephone, but I didn’t know he had worked on a lot of other things, including planes and hydrofoil boats.

Day 5 – Baddeck to Sydney (80 km, 825 km climbing)

I got a flat tire on the way back to Sydney, but other than that, the ride was uneventful and very similar to the ride from Sydney to Baddeck. I made one small deviation to go through North Sydney and stopped at the Lobster Pound and Moore for lunch – I’m glad I did, since that’s where I got my best seafood chowder of the trip, with great service and a generous portion.

After dropping the bike and showering+taking a nap, I went to explore the Sydney boardwalk and had a donair, then took it easy for the rest of the night since I was flying back to Montreal early the next day.

Can I see this on a map?

Here you go – note that this one has car driving directions, which stay on the Cabot Trail. If you ask Google Maps for cycling directions, it will make you avoid it at times.

You can also click on the distance/climbing for each day of the Cabot Trail above to view details from MapMyRide.

How was the pavement?

Very good, for the most part. There were only 5-10 km out of nearly 300 that reminded me of Montreal. There was also construction/road work on maybe 20-30 km, but eh, that’s the price to pay for keeping the pavement nice…

Drivers were respectful and generally gave me plenty of room when passing, but having a helmet mirror would have made me feel better when I heard them coming.

Yeah, but what about your pictures?

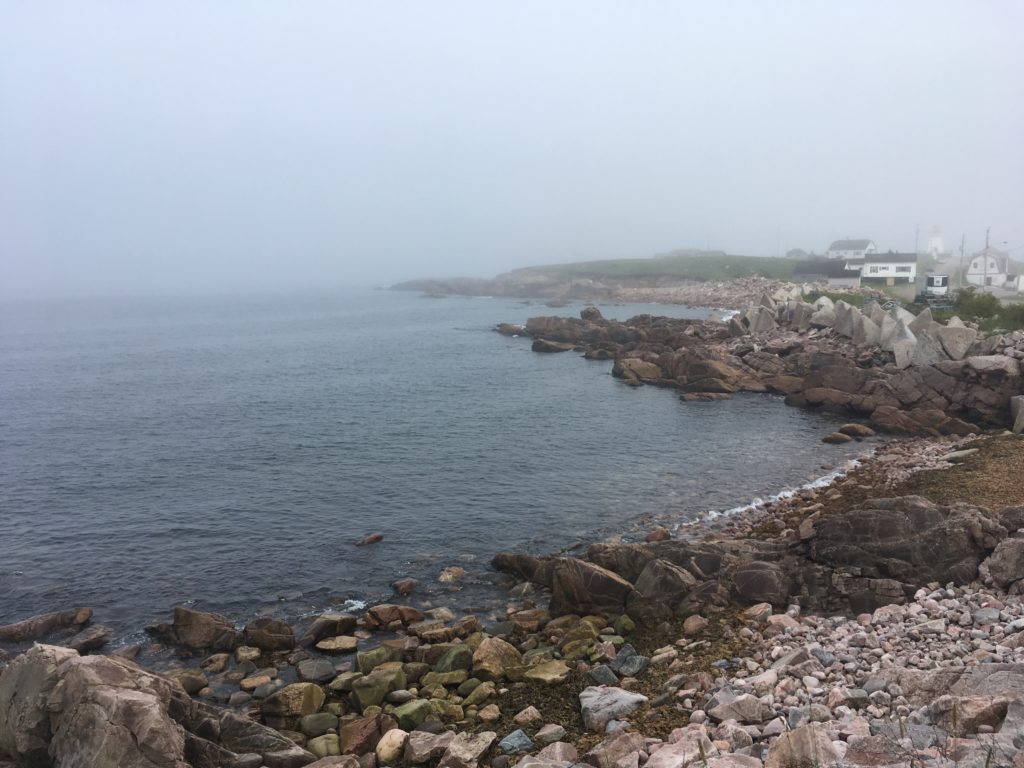
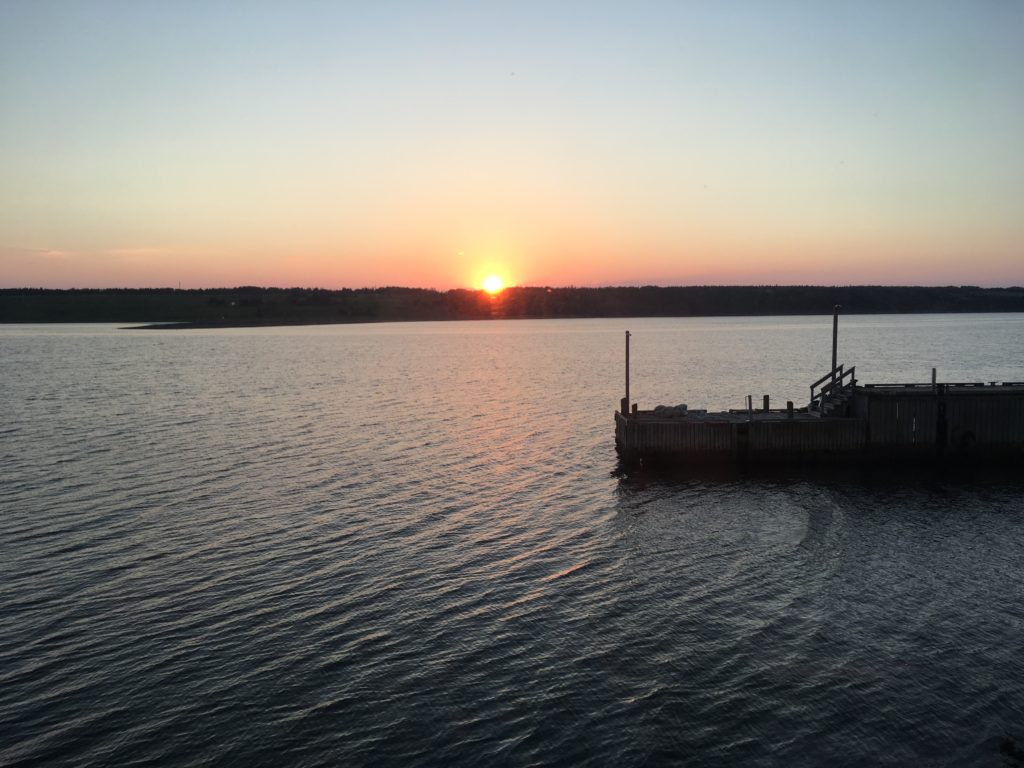
There are lots of people who are more talented and/or dedicated than me when it comes to taking pictures. Searching Google Images for “Cabot Trail” should yield good results. That said, here are a few pictures I took:

View on the way to Smokey Mountain
Nice descent
Foggy Neil’s Harbour in the evening
North Mountain climb and viewpoint
My bike
Sunset in Chéticamp

Any other question?

Just ask in the comments.

Thanks for reading!

UA895 Wi-Fi Review – Chicago to Hong Kong

On October 2015, 2015, I flew to Hong Kong via Chicago on United Airlines flight UA895. The Chicago-Hong Kong flight was 16 hours, and I hoped that Wi-Fi would be available on the plane, at least for part of the flight. I didn’t find much in terms of reviews prior to the flight, so here’s mine.

Short version:

Available: yes, for about 60% of the flight
Cost: $16.99 for 1 laptop
Signal quality: very variable, mainly OK for emails and light web browsing

Long version:

Wi-Fi was available for purchase for $16.99 once we reached a bit more than 10,000 feet. United MileagePlus members can log in to their account before purchasing Wi-Fi, which will allow them to transfer the connection to another device (only one device can be used at a time). The Wi-Fi purchase will only be valid on one device and cannot be transferred for those who purchase without logging in to a MileagePlus account.

The connection was initially pretty decent, but came with a warning that the signal may or would not be available:

  • while heading north before reaching the North Pole (up to 40 minutes)
  • while over the North Pole (up to 3 hours)
  • while over Chinese airspace (time not mentioned, but probably 3 hours as well)

The connection indeed got worse and dropped at various points during the flight, which is not necessarily that bad of a thing since it’s good to sleep on at least part of a 16-hour flight!

As usual with in-flight Wi-Fi, video was disabled, but the signal was good enough to download and send emails, read the news, and other light web browsing. I’m pleased with the experience and found the price to be much more reasonable than Delta’s $50 price tag for Wi-Fi on a Detroit-Seoul flight last year.

Note that your experience could be different based on the aircraft you’re on and the flight path on the day of your flight.

Here are some screenshots:

WiFi Info

United_Portal_-_Purchase_-_2015-10-25_16.07.45

United_Portal_-_2015-10-25_21.36.29

car2go to YUL/Trudeau Airport – Worth it?

When Communauto launched its Auto-Mobile car sharing service, where you can take a car, drive it and park it at your destination while only paying for the ride time, I was enthusiastic and figured one of the best use cases would be going to the airport – surely, another member would take the car there to go back home, and both would save on a taxi.

This hasn’t happened yet (I’m sure regulation at the airport doesn’t help), but car2go launched something similar a few months ago: you can take a car2go, park it at the Aeroparc lot, and then take the free shuttle to the Pierre Elliott Trudeau (YUL) airport. There’s a $7.50 fee on top of the regular car2go rates to cover for the parking.

I used the service to go to the airport October 12 and it works reasonably well.  However, it’s not really door-to-door like a cab would be: you need to get to a car2go (closest one was a 10 minute walk from my apartment at that time), drive it, park it at Aeroparc, and then wait for and take the shuttle to the airport. The cars aren’t super comfortable either.

The ride ended up costing 14,99$ (about 40 minutes of driving) + 1$ safe ride fee + $7.50 Airport parking fee = $23.49 before taxes, which is $27.01 after taxes. Granted, I got lost because of a wrong address in a Gazette article, and I estimate that the ride could have cost $19.20 in the best case scenario, but it’s not particularly cheap for driving yourself to the airport.

Two weeks later, I went to the airport with a UberX in low traffic and managed to get there in 17 minutes, for about $2 more than what I calculated would be the best case scenario with car2go.

From Jean-Talon Market to YUL

car2go – my experience car2go – best case scenario UberX – my experience
Door-to-door time
60 minutes 30-35 minutes 17 minutes
Cost $27.01  $19.20 $21.29


This is from the Jean-Talon Market area, and your mileage may vary, but my conclusion is that car2go to the airport is not as helpful as I initially expected. I think it’s a good option when

  • only one person needs to travel (or two with very limited luggage)
  • there’s a car2go available right next door / you’re not in a rush
  • there are no UberX’s nearby or Uber has surge pricing in place

Otherwise, my experience is that UberX will be faster (drops you at the airport terminal, with no shuttle to take), more comfortable, and very close in pricing.

If car2go (or Communauto with Auto-Mobile) managed to get parking spots that are within a few minutes walk of the terminals, the situation would be different.

The comparison would also be different for getting back home from the airport, since Uber is not allowed to pick up there, and the comparison would therefore be between car2go and regular taxis, not UberX.

Have you tried riding car2go to YUL? If so, what was your experience? Feel free to post in the comments.

Dolar Blue: getting the best rate for Argentine Pesos (ARS)

I just came back from Argentina and figured I would share some up-to-date information on getting Argentine Pesos for the best possible price thanks to the Dolar Blue.

In short, the current official exchange rate of about 8 pesos per US dollar isn’t what you want to purchase your pesos at. Instead, you want to get the Dolar Blue rate (currently around 10.6 pesos per dollar), instantly giving you over 30% more buying power – although that buying power increase can be over 50% at times based on exchange rate variations.

You can get pesos cheaper than the official rate because USDs are hard to get at that rate for Argentines, and they’re willing to pay a premium to get the dollars they need for some transactions – or simply want to keep as an edge against rampant inflation.

This is done on a “black market” that is actually tolerated by the government, as illustrated by the police officers doing absolutely nothing while people are changing money within a few feet of them on Calle Florida in Buenos Aires, among other places.

Converting US Dollars (USD) to Argentine Pesos (ARS) in Buenos Aires

1. Bring all the money you think you’ll need in Argentina in USD bills. We carried $1400 in a well-hidden money belt, for example. Euros and Reals should also work.

2. Head out to Calle Florida (we used the subte – the subway – for that, at a cost of about $0.50 per person (5 pesos) – the Florida subte station is the closest one) during store hours any day of the week.

3. Walk a bit and you’ll most certainly hear someone shouting “Cambio, cambio, cambio! Dólares, euros, reales. Cambio!” or something similar. Just ask them what their rate is, compare it with what you’ve seen on dolarblue.net, and negotiate if you want. We generally negotiated with two or three arbolitos (the people shouting “cambio!”) and went with the one with the best rate. If you have large denominations, make sure to mention it as it may get you a slightly better rate*.

4. The arbolito will probably ask you to follow him inside a store (or get someone with the actual money to come to you) and you may then proceed to change your money.

Converting US Dollars (USD) to Argentine Pesos (ARS) in El Chalten or El Calafate

It is still possible to change USD to ARS outside of Buenos Aires, but in the tourist towns of Patagonia, you’ll get a less favourable rate since the supply of foreign currency from tourists in proportion to the needs of the local population is much higher than in the capital.

While we got anywhere from 10.6 to 10.75 pesos per dollar on Calle Florida in Buenos Aires, we had to settle for 10 in a pizzeria in El Chalten, 9 from our hostel in El Calafate, and 8.25 from a cab driver in El Calafate. Worse yet, we ran out of pesos at the airport in El Calafate (didn’t know there was an airport tax to pay before flying out) and had to withdraw some from an ATM at the official rate + a $6 fee – ouch.

Moral of the story: bring enough USD, and while you don’t want to change too much to pesos since you won’t be able to convert these back as dollars, make sure to change enough when you have access to a good rate so you don’t run out of pesos and have to change at a worse rate later.

Also, if you have too many pesos left and leave the country via the EZE airport in Buenos Aires, you can use them to pay at the huge duty free shop after going through customs in the airport: they list prices in USD, but accept pesos at the official exchange rate, which is not a bad deal, and better than being stuck with useless currency once you’re back home.

I hope this information will be helpful for some – if you have questions, just ask in the comments.

* Larger denominations, especially $100 bills, are preferred and will get you a slightly better rate since they’re easier to carry, but I would recommend bringing $50 and $20 bills in case you run out of pesos changed at the dolar blue rate – you will likely be able to pay in USD in that case, but will get your change back based on the less favourable official exchange rate.

Converting USD/CAD with Interactive Brokers: How-To

Converting currencies with Interactive Brokers can be confusing at first, so, as a follow-up to my post on paying as little commission as possible when converting US and Canadian dollars, here’s a quick tutorial on how to do that.

1) Linking Accounts

If you’d like to fund your account via ETF, you’ll need to configure your bank accounts in your Interactive Brokers (IB) account. For that, you need to add what they call an “Instruction”. They’ll then make a small deposit in your bank account, you’ll confirm the amount and you’ll then be able to use the instruction to transfer funds in and out of your IB account, subject to their hold policy.

Canadians can link both CAD and USD-denominated bank accounts held at Canadian banks to their IB account.

You can add Fund Transfer Instructions in the Account Management area of the IB website:

add_instruction

Once you’ve validated the instruction by entering the small deposit amount that you’ve received from IB to verify your bank account, you can deposit/withdraw funds by creating a Fund Transfer Instruction, also in your Account Management area:

add_transfer

More information:   Funding your account | Withdrawals

2) Converting Currencies

2.1) Log in to the Web Trader platform

2.2) In the order management section, choose Forex, and select Buy if you want to buy USD, and sell if you want to sell USD. Enter the amount of USD you want to sell for a SELL order, or the amount of CAD you want to convert to USD for a BUY order.

2.3) In the symbol field, type “USD” and then click the “Go” button. You should be able to choose the USD.CAD currency pair in the drop-down:

enter_order

2.4) Change the order terms (order type, limit price, etc.) if you’d like.

2.5) Click “Preview Order” and make sure the information is accurate and that you’ve entered the correct amount in the source/destination currency (so you don’t end up selling the equivalent of 5000 CAD instead of 5000 USD, for example):

preview_order

2.6) Click “Submit Order” and wait for your order to be filled (almost instantaneous for market orders during market hours, while limit orders may or may not be executed depending on your limit price).

That’s it! The interface may look scary at first, but I find it’s well worth the savings if you’re converting tens of thousands of dollars per year through Interactive Brokers.

3) What to do afterwards?

Depending on how you funded your account, there may be a rather long hold period for your funds (currently 3 business days for wire transfers and 60 business days for EFTs). You may leave the funds in your cash balance while waiting for the hold to expire, or you can use them to buy stocks/ETFs if you prefer. I tend to buy short-term bond ETFs like XSB and sell them after the hold period ends, but that’s a matter of personal preference.

***

I hope this information was helpful. Don’t hesitate to post in the comments if you appreciated it (it’s always nice to see that people liked a blog post) or if you have any question.

How to: subscribe to DRIPs for ETFs at Scotia iTrade

One of the downsides of exchange-traded funds (ETF) compared to mutual funds when investing in the stock market used to be that you could not automatically reinvest your dividend/interest distributions. This meant that you ended up with money sitting in your account until you purchased more shares, but the commissions on each purchase didn’t always make it economical to do that often.

It is now possible to subscribe to Dividend Reinvestment Plans with several Canadian providers, but it is necessary to contact your broker for that (assuming they support it). I couldn’t easily find information on how to do that with Scotia iTrade in December, so I figured I’d now post about it in case it could benefit other people.

Here’s what they told me when I inquired about the procedure:

You can enroll your securities on DRIP by calling in and speak to a representative. You need to provide them the list of securities you want to enroll and the account number these securities are settled in. Alternatively, you can email this information to us. Please be advised: To qualify for DRIP, the dividends received must be enough for one additional share. We do not give fractional shares. We cannot enroll future securities in DRIP. Once new securities are settled in your account, you can give us instructions to enroll them on DRIP.

For further assistance, please contact us at 1-888-872-3388 or (416) 214-6457 from 8am to 9pm ET weekdays or 8am to 6pm ET weekends.

I therefore emailed them at service@scotiaitrade.com to request that they enroll my Vanguard and iShares ETFs on DRIPs and they did so the next day.

How do the DRIPs work?

Once your securities are enrolled to DRIPs, you’ll get as many full ETF shares as the dividends allow you to buy, and the remaining amount will be deposited as cash in your account. For example, if the stock trades for $25 and you get a $49 dividend, you’ll get 1 more share + $24, while if you get a $51 dividend, you’ll get 2 more shares + $1. This is because ETFs cannot issue partial shares.

Because of that, there’s a minimum holding amount under which DRIPs won’t help much, and it varies by ETF. For example, XBB has a monthly distribution of approximately $0.085 per share, and a share price of $31.26 as of 2013-01-03. This means that you would need a minimum of about 368 ($31.26/$0.085) XBB shares to get one new share as part of the DRIP. Canadian Couch Potato has an interesting post with examples for those who’d like to learn more about this.

Here’s an example with 566 shares of XBB. Note that the proportion of the distribution that gets reinvested is about 65% in this case ($31.26/$48.02), but it could be larger with more shares, or if the distribution was higher.

Scotia iTrade ETF DRIP example (XBB)

Converting USD to CAD: how to pay almost no currency conversion fees

[Do you convert more than $10k from USD to CAD or vice-versa annually? If so, read below for tips to save hundreds or thousands of dollars on currency conversion fees.]

Some people don’t realize it, but banks make quite a bit of money with currency exchange, with some of them charging you over 3% of the amount you convert. Assuming you have $10,000 to convert, this means over $300 in fees for a single transaction. Fortunately, not all banks charge as much, and there are other options where you can pay as little as 0.01% of the amount converted. See below for a discussion of these options.

First option: banks

By default, people will look to their bank to do their currency conversion. Here’s what their spreads (difference between the rates at which they convert USD to CAD and the one at which they convert CAD to USD) were on 2012-11-05, along with the amount you’d give them just to have them convert $10,000 USD to CAD.

Bank Spread You lose…
CIBC 6.67% $334
Scotia 5.75% $288
BMO 5.30% $265
TD 5.28% $264
RBC 5.20% $260
Desjardins 4.98% $249
HSBC 3.80% $190
ING Direct 2.90% $145

It turns out that if you want minimum hassle and don’t convert money that often, ING Direct is a good choice. It’s very easy to open a business or personal account online, and you can deposit cheques by simply writing your customer and account numbers on them and mailing them to ING Direct. It’s not as convenient if you need to receive wire transfers in USD, as they don’t allow that, but you can have a USD bank account at regular bank, link it with your ING Direct account and transfer funds to do the currency conversion at ING Direct.

Second option: forex brokers

Some businesses specialize in currency conversion and differentiate themselves by offering better rates than the banks do, among other things. While reading on the subject, I came across Knightsbridge FX and XETrade. Their spreads usually vary between 1% and 2%, which means that you’d lose $50-$100 to spread to convert $10,000. You also need to pay a wire transfer fee (approx $20) to fund your account with Knightsbridge, but it’s still a nice improvement over what you’d pay banks.

Third option: Interactive Brokers

Interactive Brokers is a trading platform that lets you convert currencies and which can be linked to both USD and CAD-denominated bank accounts based in Canada. They have a minimum monthly fee of $10, but their fee for currency conversions is hard to beat: 0.01%, with a $2.50 minimum. This means that any amount under $25,000 can be converted for a flat $2.50 charge.

With that said, IB is not for everyone:

  • They have fairly lengthy paperwork. I estimate it took me 3-4 hours to set up the account.
  • They require a $10,000 minimum deposit to open an account.
  • Their $10 minimum monthly fee means it makes no sense to use them if you’re going to save less than $120 per year in fees with them.
  • Their tools are designed for traders and can be confusing for laymen, especially at first.
  • If you fund your account via EFT to save on wire transfer fees, you cannot withdraw the funds to a different bank account (e.g. to your CAD account if the funds came from the USD account) for 45 business days, or approx. 2 months*.

If you don’t mind these limitations, however, they can be great. If you have $50k to convert in a year, I estimate that Interactive Brokers can save you $1,180 compared to doing currency conversions at RBC and $605 compared to doing them at ING Direct. Not that bad for a 4-hour account setup and maybe an extra 2 hours to get familiar with the tools…

* They have cheap commissions on stock purchases, though, so you can buy some bond ETFs like XBB while waiting for the hold to expire to withdraw funds to your bank account.

My setup

I get payments from US clients both by wire transfers and by cheques.

I have a business USD account at RBC and maintain a $2,500 balance to avoid the $9 minimum monthly fee. Wire transfers and cheques are deposited in that account.

That account, as well as my CAD account, is linked with my Interactive Brokers account so I can move money between them via EFT.

When I need to convert money, I transfer it from RBC to Interactive Brokers, convert it to CAD there, and send it to my CAD bank account once the hold period expires. I sometimes buy stocks with the CAD funds while waiting for the hold to expire.

—-

This is the best setup I found for my situation, but as noted above, the best solution depends on your needs. If you have questions or would like more information about the options above, feel free to let me know in the comments.

MailChimp vs Campaign Monitor: Email Marketing Software Comparison

What’s the best email marketing solution for my needs? That’s the question I recently had to answer for a client who needs to send a newsletter to thousands of people several times per month, and I decided to revisit current offerings to do so. I didn’t find that many up-to-date comparisons, so I decided to share my findings here.

Contenders:
Self-hosted solutions: I used these 10 years ago for small lists, but running your own lists is not recommended and can cause delivery issues, so I skipped that option.

Enterprise-grade solutions (Exact Target, Constant Contact and the like): these can be great for large lists as they have some very powerful features, but they’re also quite expensive, and overkill for my client. I therefore chose not to focus on that option either.

Entry/mid-market solutions: this is where I spent the most time. I chose to evaluate two of the most known solutions out there: MailChimp and Campaign Monitor. I also compared them with a slightly lower-priced alternative, GetResponse *, but decided to discard it because the tool wasn’t as user-friendly as the other two and forced you to include its logo in newsletter, even with the paid service.

MailChimp vs Campaign Monitor: pros and cons

I read on Quora that both services were good and that the preferred one would depend on your needs. Here’s what I found out:

Pricing: MailChimp win

MailChimp is priced the same or lower than Campaign Monitor for all levels of subscribers:

Monthly cost based on subscriber count

Subscribers (up to…)
500 1,000 2,500 5,000 10,000 25,000 50,000
MailChimp $10 $15 $30 $50 $75 $150 $240
Campaign Monitor $15 $30 $30 $55 $100 $250 $500
Difference (CM vs MC) 50% 100% 0% 10% 33% 67% 108%

As you can see, Campaign Monitor can cost more than twice as much as MailChimp for large lists. I contacted Campaign Monitor to inquire about that and quickly received the following response:

Our prices haven’t actually changed at all but this is something we’re doing a little bit of investigation on but they certainly won’t be moving up.

[…]

We may never be the cheapest out there but an easy to use product offers plenty more value in the time it saves you.

… which is a very fair response, in my opinion. I just needed to do more research to see if CM was really worth the price difference over MC for my client.

Agency/referral programs: tie

Campaign Monitor was built with agencies in mind, and they allow having a master account with sub-accounts for customers. Furthermore, they allow agencies to set up their own price for the Campaign Monitor services they resell, which lets the agencies pocket the difference.

MailChimp doesn’t currently have any such program. They do offer an “agency” program that they described to me as follows, which is not very convenient in my opinion:

our Agency program is a discount program that provides a 15% discount on send packages for the purpose of reselling. It’s assumed under the agency program that you would manage all of your clients under one production account and your clients would never need direct access to this account.

For agencies that want to resell a service, Campaign Monitor seems to be the clear winner. However, MailChimp offers one thing that Campaign Monitor doesn’t: a referral program. You can get a 15% lifetime commission on the monthly spend of customers you send their way. This can be great if you simply want to refer a client to a service provider without having to deal with account management and billing like with Campaign Monitor.

Customer service: tie

I was very pleased with the timeliness and quality of replies I got from both companies. If banks and telcos could offer the same quality of service, the world would be a better place.

Actual features: tie?

This one is a bit harder to evaluate, as it really depends on your needs. Both services are quite user-friendly and have all the basic features that you may need, as well as APIs.

I found that the MailChimp WYSIWYG newsletter editor was a bit more convenient than Campaign Monitor’s for my client’s needs, but the difference wasn’t that significant.

Campaign Monitor mentions that World View is one of their key features, and it is indeed very nice, but I found that the reports provided by MailChimp were quite helpful as well. They may not go into as much details as World View does, but they still allow you to view open statistics by country and zoom down to the region level, which can be quite helpful:

Map of Sweden - by MailChimp

Conclusion: sign up for free trials and run some tests if you have time

MailChimp is the clear winner on pricing, but for other categories, the comparison isn’t as clear. As a MailChimp rep put it in an email he sent me:

Comparing ESP’s is kind of like comparing cars. They all get you from point A to point B. What matters is features and experience along the way. Nothing this, you would want to test out each ESP first to see which better suits your requirements.

Unless there were some deal breakers for you in the items I discussed above, I’d say that both tools are worth a look. The good news is that they both have free trials available and you can therefore easily test them.

I hope this information was helpful. If you have any question or findings that you’d like to share, feel free to post in the comments below. Thanks!

Note: If you appreciated the information in this post and would like to credit one of my affiliate accounts with your sign up after having completed your own research, feel free to use the links below. These are the only affiliate links in this post:

CampaignMonitor (no affiliate program)  |  MailChimp  |  GetResponse


* GetResponse appears to be quite decent feature-wise, but the fact that they force you to include their logo in your newsletters was a deal breaker for me. I also ran into some problems trying to translate parts of the email in Swedish, while this could be done very easily with the other solutions since they give you control on 100% of your template. Their customer service seemed OK, but wasn’t as effective as MailChimp’s or CampaignMonitor’s when I contacted them.

If these things are not a problem for you, they may be worth looking into, however: their pricing is slightly lower than the other two’s, especially if you pay yearly, and they have a very generous affiliate program with a 33% commission, compared to 15% for MailChimp and none for CampaignMonitor.

ISO 3166 country list: nicely formatted in CSV and SQL format

[updated 2014-06-29]

I recently had to add a country selection list on a form on the website of a customer who does business internationally, and couldn’t find an up-to-date, easy-to-use list of countries already available. The closest was the ISO 3166 country list (HTML version here), but there are a few issues with it in my opinion:

  • Country names are all capitalized, which makes them a bit harder to read (UNITED ARAB EMIRATES vs United Arab Emirates for example)
  • They list official country names, which can sometimes be quite long even in their “short” version, such as MACEDONIA, THE FORMER YUGOSLAV REPUBLIC OF.

I therefore took their latest list of 249 countries (as of February 2012) and fixed the capitalization/shortened the names of a few countries to more usual ones (e.g. Macedonia instead of MACEDONIA, THE FORMER YUGOSLAV REPUBLIC OF). I did the same with the list of French country names and merged the English and French lists together, resulting in a table with the following 3 columns:

  • ISO 3166 country code
  • English Name
  • French Name

These are free for everyone to download and redistribute. I hope it saves you some time.

Downloads – files last updated 2014-06-29

ISO 3166 country code/country name list – Excel format

ISO 3166 country code/country name list – CSV format

ISO 3166 country code/country name list – SQL format (creates an InnoDB table named countries with MySQL syntax)

Content Delivery Networks: Cloud Files vs CloudFront

In order to allow faster content delivery and reduce server load for Dinstinct, I started looking at content delivery network (CDN) options a few days ago. Dinstinct is fast-growing, but still relatively small, so using expensive big names was out of the question. I therefore turned my attention to cloud CDNs, namely Rackspace’s Cloud Files and Amazon’s CloudFront, and reviewed them to find which one would be best suited for the site’s needs.

Amazon CloudFront vs Rackspace Cloud Files

Pricing: Rackspace has a flat $0.18/GB fee, while Amazon starts at $0.12/GB in North America and its price goes down with volume. However, Amazon makes you pay for the bandwidth between their storage system (S3) and the CDN nodes, and they also charge a per request fee of $0.0075 per 10,000 requests, which could add an extra $0.75 per GB for 1 kB image thumbnails. Which one is the most affordable depends on your usage scenario – large files would be cheaper on S3, while smaller ones are cheaper on Cloud Files.

Network Reach: The Cloud Files comparison page currently states that

Rackspace has partnered with the market leader, Akamai Technologies, Inc. Akamai claims the most pervasive, highly-distributed CDN platform with over 84,000 servers in 72 countries within nearly 1,000 networks.

I was surprised after reading this, because my experience with Akamai is that they’re relatively expensive, and getting access to their network for $0.18/GB, with no monthly minimum, seemed almost too good to be true. When I ran a traceroute from my computer in Montreal to a Cloud Files host, however, I noticed that it took 7 hops, and the host was in New York. I found that a bit strange since a traceroute to www.akamai.com only requires 5 hops from here.

It turns out that while the two sentences that I quoted above from the Cloud Files comparison page are both individually correct, they are slightly misleading together, in my opinion. Yes, Rackspace uses Akamai. Yes, Akamai has servers within nearly 1,000 networks. However, Cloud Files CDN customers don’t have access to all these Akamai nodes – Cloud Files is connected to about 40 Akamai nodes, from what I later learned by contacting Rackspace support. That’s still twice as many as CloudFront and its 19 edge locations, but don’t expect to get access to the full Akamai network when using the Cloud Files CDN.

Support: I haven’t tried Amazon’s support, but I did contact Rackspace’s and must say that they lived by their “fanatical support” guarantee. They are very easy to get in touch with, be it by phone, by live chat or by opening a support ticket, and provide helpful answers even on accounts that only bring them a few dollars per month. I can’t say for sure that Rackspace is superior here, but given that Amazon charges for Premium Support, I think Rackspace at least has a slight advantage.

SSL Delivery: they both allow you to serve files from secure URLs (starting with https). Amazon charges a small premium for that, but Rackspace currenty does not.

Access Control: Amazon S3 (where you host files to be served with CloudFront) gives you some control on who can read or edit files. On Cloud Files, however, you only get one API key per account, and you need to open separate accounts (that will be billed separately) if you want separate API keys. S3 might therefore be a winner if you need to have different users accessing the same account with different permissions (different applications, for example).

I ended up selecting Rackspace for their support, network reach and simpler pricing, but I think Amazon’s offering is very competitive.

Getting started with Rackspace Cloud Files CDN: quick and easy

Once I decided to go with Cloud Files, the process was really easy. I opened an account and was told that they would call within an hour to verify it and then activate the account. I got the phone call about 15 minutes later, and after I answered a few questions, the account was activated.

I then downloaded their PHP API and played with it a little bit. The documentation was not 100% accurate (some variable names were no longer what the documentation mentioned), but I was able to connect to the account, list containers, create containers, and upload files very easily. I ended up only needing the following code to upload files:

require_once 'cloudfiles.php';
try
{
    $auth = new CF_Authentication(CLOUDFILES_USERNAME, CLOUDFILES_API_KEY);
    $auth->authenticate();
    $conn = new CF_Connection($auth);

    $cf_images = $conn->get_container(CLOUDFILES_CONTAINER_NAME);
    foreach ($files_to_upload as $filename)
    {
        $cf_file = $cf_images->create_object($filename);
        $cf_file->load_from_filename(OUR_IMAGE_DIRECTORY.'/'.$filename);
    }

    //close connection
    $conn->close();
}
catch (Exception $e) { }

I added this code to the product picture upload logic in Dinstinct’s admin interface, and product pictures are now automatically sent to Cloud Files when they are uploaded. We can therefore have the pictures served from the CDN without any extra work from the people uploading them and at a very reasonable price.

——

If you have any question or comment, please let me know by commenting this post. Thanks!